A. Sod Site
You probably already have the area or sod site in mind, or maybe you are digging up an existing lawn to be replaced? There are many things to consider before starting any project that can save you time and money.
These things must be discovered and addressed in the lawn design and planning stages.
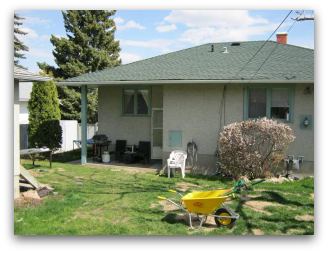
Below is a poorly neglected yard that will be overhauled with a patio, a walkway, a stone wall, and some new sod.
Any home construction project should always start with a call to your local town or by-law office. You probably don't require a permit to sod a lawn, but better safe than sorry. If you have any other other projects planned, you can check on them too.
Here are some other things to consider before you start anything in your yard.
1. Planning
Now is the time to plan how you are going to control water. Berms and swales are what experienced landscapers use when grading soil. Grading and drainage will be covered more extensively a little later on.
Many times people are unsure of how to plan a new yard. Fences, decks, patios, rain downspouts, and other landscaping features have to be thought out before you begin. Not everyone is fussy about details, but some of them are important.
When installing a fence, the bottom boards should be set accordingly to accept a minimum of four to six inches of loam and the sod. This can save you the headache of having to work with poor soil, or fill material before your loam is brought in.
Another example of detailed planning is setting concrete footings for a deck. Companies often set the posts too high leaving an unsightly piece of concrete sticking way out of the ground. Building up the lawn to cover this is not always possible.
The same goes for everything in your yard with new construction. Walk around your property and pay attention to everything that can impact grading and drainage. These are little things if tackled now, but can become very costly down the road if overlooked.
Builders will leave your yard with a "Final Grade". This is supposed to be a properly graded yard that is prepared to accept 4 to 6 inches of loam. This is rarely ever the case.
In most cases this is fill material, not loam. If you can, insist to your builder on having the final grade prepared so that your sod site will accept at least four inches of loam (six is better).
Steep slopes may not be practical to mow. Consider alternatives now, like a rock garden or retaining wall. This will eliminate the dangers of mowing the slope. Slopes often have poor water retention, and can become a burnt dry area in the hot summer months.
Sodding in and around trees with heavy canopies can be a challenging venture. Trees take away most of the sunlight from above. They also have extensive root systems that compete with your grass for moisture.
You may want to consider seeding these areas with a more shade and drought tolerant variety. Another option for you is to have the tree pruned by a professional to allow more sunlight through.
If you have a dog, be aware that their urine contains high concentrations of nitrogen, and kills grass. Males usually try to find a tree, females like the open lawn.
If you have a dog, sodding is definitely the better option over seeding, but dog owners should seriously consider adding a dog run to their yard. Dogs and grass just don't go well together.
For those of you in a new subdivision, try to co-ordinate your efforts with your neighbors. Sometimes you can work together to save both of you money. Splitting on the rental of equipment, and the cost of materials is worth it.
It is also important to work together along fence or property lines to coordinate projects that don't affect the other in a negative way. This could mean building swales between properties to avoid drainage problems for both of you.
Between closely built houses, or heavily shaded areas, you should consider alternative ground covers. You may decide to install landscape fabric, gravel and/or decorative rock instead.
I have done this on many occasions for homeowners that complained of poorly growing grass. You can also try sodding or seeding with a variety that is more tolerant to shade here as well. Even shade tolerant grasses require at least a few hours of sunlight a day.
If you are adding any other features to your yard, make sure you add them first to avoid the headache of ruining your newly sodded lawn. I know this sounds basic, but I have seen this done many times over. This applies to drain tile, power for lighting, irrigation or any other buried lines that you may need for your other projects.
If you live in a northern climate, grass down the edge of a driveway is more likely to experience winter kill from piled snow, ice and salt.
You may want to leave a buffer strip of decorative rock and hearty shrubs here. This is becoming more and more popular as it is practical and more appealing than dead grass each spring.
Make sure you are not going on vacation for a few weeks either. Newly sodded yards require special attention until they are established.
How much grass do you want to mow and maintain? Make sure you don't bite off more than you can chew. Lawn designs should always factor in size, and how much time you will spend cutting, trimming, and watering you lawn.
Do you live in a dry climate? Consider access to water and water restrictions you may have in your area during the summer. If you want a lush lawn but can't always be there to move a sprinkler around, consider installing an irrigation system. Although some people can install their own irrigation successfully, we recommend having irrigation installed by professionals.
When dealing with lawn design, also make your shapes and lines practical. Don't leave yourself awkward mowing areas, like thin strips of grass not wide enough for a mower.
If you have edging and garden beds, make sure the curves can be followed easily by a lawn mower.
Steep slopes may not be practical to mow. Consider alternatives now (perhaps a rock garden or retaining wall), to eliminate having to mow areas like this. They can be dangerous to mow, and have a hard time holding water in the soil. This can make them a dry unattractive burnt patch in the hotter months.
Transition zones are any points that are going to connect your lawn to other features in your yard like, patios, gardens, walls, driveways etc. Make sure you have a plan on how you are going to connect them, and check out our module on Edging and Decorative Rock. I use buffers in my transition zones of plants and decorative quite often. These rock beds can also reduce the size of your lawn, while giving it more variety.
Use edging to contain whatever material is in your buffer zone, from migrating into the grass. If you have to raise your lawn for drainage, a transition zone is a great way to take away small grade changes as well.
Also keep in mind that whatever you do in the transition zones, try to repeat patterns, colors and shapes to give a nice rhythm. This rhythm will give your design a unity and flow that will make it look “right”.
When you are planning your ideas use an inverted marking paint to mark your lines. You can also use a garden hose or rope. Are your ideas practical? Try to get an overhead view from a deck or window from the house. This is very helpful when designing a yard.
Keep your eye on the weather forecasts as well. You don't want to do any work with rain in the forecast. Heavy grading equipment will make an absolute mess if it's wet out.
Make sure you order your sod after the ground is prepared, and lay it within 24 hours of delivery. If it has to sit, keep it in shade or covered.
I know there are always more things to consider in the planning stages, but we just can't possibly cover it all. Hopefully we are getting you on the right track.
2. Excavating
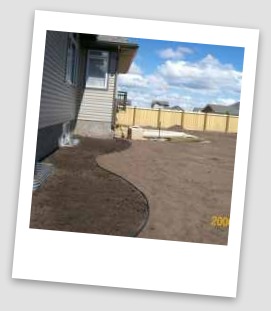
You may have to remove some of the fill and clay in your yard to allow enough room for loam. As I said earlier, six inches is preferred, with a minimum of four inches.
You might want to consider dumping fees in your area so you can truly estimate all your costs. Some cities charge a fee for this. In my city, it is $85 per ton for dumping anything other than clean fill, this includes sod, and only $3 per ton for clean fill.
I suggest you call the city or the landfill site to find out your local rules and fees.
If you need clean fill, or need to get rid of some, be resourceful to save money. Put an add in your local bargain finder. Sometimes you may find someone looking for, or to get rid of fill.
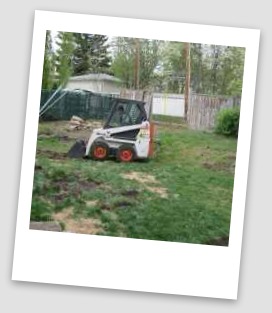
Having someone do the excavation for you can actually be the quickest and cheapest way. They will come in, dig your site out, remove the clay or fill (if you have any), and grade the loam.
We have tested this theory. Most places can do this for about the same price of you renting a bobcat for the day. They usually have it all done in a few hours. This is worth the money. (Make sure they are reputable, and experienced in grading.)
If you have to separate the sod from the dirt, I recommend renting a sod remover.
Make sure if you are sodding a new yard, that you clean out the gravel and construction debris left along the edges of concrete driveways and walkways. Be careful not to remove any of the supportive edge itself. If you don't, the perimeter pieces will not be able to establish a good enough root system to flourish. I am sure you have seen dead pieces like this walking along sidewalks before.
3. Be aware of all the forces of nature around your sod site.
This means that you should know the drainage flow of water from rains, building downspouts, or heavy snow accumulation. If it is a new house try to monitor the flow of water so you can plan your grading accordingly. (Not many people visit their house in the construction stage when it's raining, but here is a good reason to do so.)
4. Be aware of any man made objects that may impact your sod site.
Underground gas lines, power lines, cable, water, phone, sewer, septic systems, buried drain tile can all cause you grief. ALWAYS call before you dig. Most regions have a 1-800 number and they will come out and mark the utilities with flags and/or landscape marking paint for you at no charge. This may save your life.
If you already have in ground irrigation, make sure you call your service company to map out where your lines are. (These can easily be cut with a shovel or damaged with a bobcat.) They may also want to make changes to the system and zones to benefit you. If you are planting in and around your lawn, they may want to install some drip irrigation to feed water to the plants.
5. Material and equipment planning.
Planning for materials and equipment can save lots of time. I have on occasion had to move piles more than once costing me time and money. You will be working with different materials on any project, so it's important to have a plan where you are going to keep your piles.
If you are having products like soil delivered, make sure you are there when the truck comes. (They will just dump it anywhere unless you tell them exactly where you want it.) Some companies will ask you to put a tarp down, or mark an "X" where you want it dropped.
Make a plan as well for any equipment you have to bring in your yard. Grading equipment like bobcats or tractors can groove existing lawn so be prepared to repair it as well.
You may have to take fences apart so make sure you have no valuables that can disappear when your yard is open. Be careful around overhead power or phone lines.
That's a lot of information. Right? These are things that landscapers have to think about during every project. We want you to be armed with our expertise.
Let's head to the tool shed...
_____________________________________
Table of Contents: Sodding a Lawn
A. Sod Site
C. Selecting and Estimating Sodding Materials
E. Laying Sod
F. Sodding Completion and Clean-up
______________________________________
Return to Dream Yard Home Page from Sod Site
Check out our time and money saving e-book

How to avoid the biggest mistakes made by DIYers, designers, and landscaping companies.
Visitor
Favorites


Giggles 'n' Thoughts
