D. Sod Grading
Sod grading is something that we recommended you leave to professionals.
They can do the prep work much more efficiently.
Heavy equipment costs money to rent, and requires an experienced operator to use it.
We don't want to completely deter you from grading your own yard.
We just want you to consider that your time may be more productive on another task.
If you are going to grade the site yourself, you should understand how to achieve proper sod grading using swales, and berms.
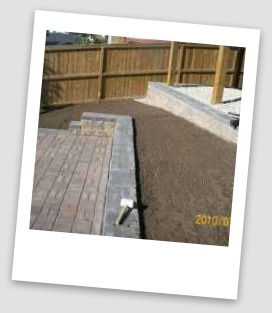
Soil grading usually comes after your hardscaping (patios, walls, and other permanent features), like in this picture below.
Working with different leveling devices
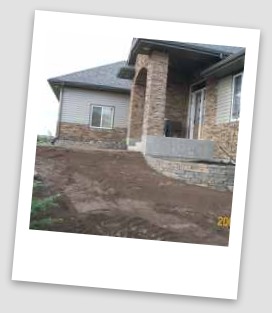
Sometimes it is obvious to you where the water goes like in this sloped yard on the right.
If you have a larger or more complicated yard then it may be a good idea to have someone transit your yard. They will be able to mark elevations and grade changes. You can spread your loam accordingly once these are marked. This will make things easier in leveling soil around the yard.
You can also do this with a laser level. The advantage of transiting and laser leveling a yard is being able to stay in one spot while marking the stakes in your line of site. It gives you a great overall read of the layout of the yard.
String levels are a much simpler way of checking slopes and can easily be used by do-it-yourselfers. It is just tightly tied string between two stakes over an area of questionable slope. You can then slip a string level on the line. By having someone move the string up or down at one end, you can watch the level to see which way it slopes.
The most basic and easiest way to deal with drainage, is by watching the flow of water in your yard when it rains. Or imitating rain with a garden hose. If your budget or abilities do not allow other methods, than this is the least you should do.
We can't be there to make sure your sod grading was done correctly. We can only stress the importance of doing it right. It will save you much grief down the road.
Whatever leveling methods you choose, just be sure that you are always draining water away from the house effectively and legally. Some of you may have specific by-laws on where you can drain your surface water. It is always up to you to contact your local by-law office before you begin anything in your yard.
Combining efforts with neighbors
I also mentioned before about talking to your neighbor about coordinating your efforts. This is a great advantage when you can work together draining water away by using swales between the properties. A swale is just a very slight ditch to collect water from two higher areas, and channel it away to another point off the property. (Like a road or back alley.)
A berm is just the reverse of a swale to stop water from flowing into whatever is behind it. You should use berms or swales to direct the flow of water accordingly.
Spreading Loam
Most landscape companies will have a small crew when soil grading for sod. One person spreading and back blading the soil with a bobcat, and a couple of people raking.
In this picture, we can see some hardscaping has been done with this yard. The natural stone wall should be carefully avoided with any heavy equipment.
Foot packing should be used to firm up soil along the front edge of this wall.
Landscape rakes are so important to have at this stage. A landscape rake is much wider than a normal rake and creates much smoother grades by covering more area with the extra width.
When you rake in both directions with a landscape rake, you eliminate having low spots where water can accumulate. Landscape rakes are great for cleaning up small rocks and debris as well.
They can also go into places to grade soil that a bobcat can't go. Use everything you have to your full advantage when sod grading.
The bobcat should be used for spreading, and back blading the larger areas in the yard. it can also be used to pack in heavy amounts of loam when you are building up soil depth. Multiple passes over the loam with the wheel tracks will firm up soil.
When you are building soil layers, you will have better success if you do this in 2 to 3 inch layers. This will help prevent soft soupy areas as soon as you start watering.
If you are using a bobcat, it's a good idea to always start your sod grading at the furthest point from your loam pile first. You can work your way back from there. This will help avoid over packing of soil by the equipment wheel tracks.
You can create hard soil mounds that are pretty hard to cut down if you aren't careful. If you are using a wheelbarrow for smaller yards this shouldn't be an issue for you.
NOTE: Make sure there are no sharp rises or drops that will cause your mower to mulch the grass too low or hit bottom in the grading stage.
If you can't pack down the soil with heavy equipment, use a water filled roller barrel or foot pack it. The water barrel is not heavy enough or designed for packing thick soil, but if you do it in thin layers it will help a little. They are mainly used for rolling the sod to ensure good contact of the roots to the soil, and removing small air pockets.
Once you have spread, packed down, and raked the soil to where it should be, you can foot pack in along fence lines, houses and driveways that you couldn't back blade or run a bobcat tire over.
If you are happy with your sod grading results, then you can
start spreading your starter fertilizer. Coverage should be at least two
pounds (up to three pounds) for every 1,000 square feet or so.
Now you are ready to lay your sod.
_____________________________________
Table of Contents: Sodding a Lawn
A. Sod Site
C. Selecting and Estimating Sodding Materials
E. Laying Sod
F. Sodding Completion and Clean-up
______________________________________
Return to Dream Yard Home Page from Sod Grading
Check out our time and money saving e-book

How to avoid the biggest mistakes made by DIYers, designers, and landscaping companies.
Visitor
Favorites


Giggles 'n' Thoughts
