D. Stepping Stone Path Site Preparation
Stepping Stone Path site preparation is the start of the physical labor. Grab your boots and gloves and let's start digging!
Before you do, we are going to cover a few more things that will help you get it done more efficiently.
Make sure you have marked any utilities to avoid damaging them with a shovel. Cable, phone, buried lighting, and irrigation lines can sometimes be pretty close to the surface. These things are your responsibility so please be careful.
If you are still looking for ideas for your yard you can visit Walkway Ideas
There are two types of paths we will be dealing with that have slightly different preparation methods.
The first one is if you are randomly placing your stepping stone path in a lawn. For this type you can skip this next step on sites requiring an excavated base.
The second type is for people building a stepping stone path in a gravel or decorative rock bed. This usually means a shallow excavation of an area to prepare for landscape fabric and gravel underneath.
It requires a little more effort to build a stepping stone pathway this way, as opposed to a pathway of stepping stones laid into the grass.
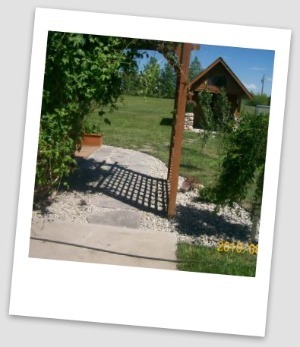
This picture below actually has both types of pathways in the same project. The first section of pathway was built in a bed of 2 inch limestone rocks around the arbor and required a shallow excavation area. The customer opted for this setup so they wouldn't have to do any mowing around this awkward area.
The second pathway is built in the lawn to go from the patio area to the shed.
We will be explaining cutting out sod around your stones in the next section Laying Stepping Stones.
Sites requiring an excavated base.
For excavating a stepping stone path built in a bed of other materials, we recommend digging to a depth of about 3 to 4 inches.
The stones themselves should be at least 2 inches thick and you will have another 2 inches of a bedding material like sand or crushed rock. This is why you will need an excavation depth of this amount.
If your walkway stones are thicker than 2 or 3 inches you will need to dig down even deeper, to accommodate this thickness. The thicker the stone, the more stable they are. This will increase your cost of materials, but it will be worth it. Thinking about pathway lighting now can save you time and effort later. Make a plan for any wiring installation that may be required for landscape lighting. Sequencing work and proper planning always saves time and money.
A small stepping stone path site preparation should be easy to excavate yourself. If it's a wide path or longer one, you may be better off renting a sod cutter to remove the grass first. You can rent these at most rental centers. (Make sure you are clear on how to use it before leaving the rental store).
A sod cutter will peel up the grass, thatch layer, and a little bit of dirt so you can roll it up and set it aside. This will save you a lot of time trying to dig through the grass and roots.
If you are not familiar with using a sod cutter, please check out this video.
If you are having someone excavate your landscaping walkway area for you with equipment, make sure they are aware of any buried utilities.
It's a good idea to use a square nosed shovel or edging tool to cut the edges of the pathway first when using any excavation equipment. It may take a little more time with this step, but this will help prevent tearing or damaging of any bordering lawn to your project area.
You should also be aware of the flow of water around you path project. If the path location has poor drainage, then consider regrading the area to correct this problem before you finish your path.
If you are building a higher path than the existing ground around you, you may actually be building a dam to contain water. (Some of these things may sound silly, but they happen every day.)
Once your pathway is excavated you can install your edging and landscaping fabric. For some great tips on working with Landscaping Fabric check out our mini-module.
Use landscape pins to keep your fabric from moving around on you. Always make sure that your fabric stays clean from dirt and debris. (You don't want to help the weeds root into anything.)
With the prep work done, it's time to start Laying the Stones.
_____________________________________
Table of Contents: Stepping Stone Path
Introduction: Stepping Stone Path
C. Stepping Stone Path Materials
D. Stepping Stone Path Site Preparation
F. Stepping Stone Path Completion
______________________________________
Go to "The Yard: Landscaping How-to Modules"
Go to Dream Yard Home Page from Stepping Stone Path Site Preparation
Check out our time and money saving e-book

How to avoid the biggest mistakes made by DIYers, designers, and landscaping companies.
Visitor
Favorites


Giggles 'n' Thoughts
