F. Laying Patio Stones
Laying patio stones will be the most time consuming part of building a flagstone patio. There are no shortcuts to doing a quality job if you want yours to look like the ones that inspired you in the first place.
See the following link for advanced flagstone tips after reading this section, if you really want your DIY project to look professional.
There are essentially two parts to laying flagstone.
The first stage involves laying them out on a lawn, sorting them, then placing them in your project area. This could take a few days to get them just right. This is like building a puzzle.
The second stage is stabilizing the stones, or you may heard it as "Packing in the stones". This is the process of working each individual stone into the bedding sand or crushed rock base.
You can pack the stones in as you place them if you like, but this has some setbacks. Placing all the stones first, will ensure you have all the pieces to the puzzle before you get into packing them.
Installing edging and jointing sand is something we will cover in the next section.
You should now have your sub-base packed in, leveled, and a layer of bedding sand or crushed stone spread out. If not, please go back to our other sections in this module by visiting the links at the bottom of this page.
Before we get into specifics about laying the flagstone let's talk about puzzles, and where the stones are going to go. Hopefully, you had some room to spread out the stones in your yard to see what you have to work with. This makes putting this puzzle together much easier.

A puzzle has corner pieces, edge pieces and center pieces, just like a flagstone patio. What we mean by this, is your stone pieces can be sorted like you sort puzzle pieces.
The edge pieces should be some of the largest and thickest pieces as they will need to be more stable. Corner pieces will also be like this. The center pieces will be all the mixed pieces left over.
Laying flagstone is also a learn as you go experience, so be patient as you will get better at it as you go. It may take a few days just to "place" the stones for a small patio (less than 300 sq. ft.), and this is normal.
It can easily take twice as long to stabilize and pack stones in, then it does place them. We want you to set realistic time lines to avoid getting frustrated.
This project picture above shows almost all the pieces have been
placed, so the next step will be to go back over them and set them.
Placing the Stones
Remember when your mother told you "patience is a virtue"? Taking your time in these next two steps will prove her right. Placing and packing the stones will take a long time, or you aren't doing it right. If you don't get frustrated you are either doing it wrong, or are a professional.
Start by walking over your stones when they are laid out looking at the different shapes and sizes, familiarize yourself with them if you can. When you find a piece that you think will fit, try it. If it doesn't fit, try another one. This will be just like doing a puzzle.
If you are having a hard time finding pieces to fit, you can trim or shape them with your hand tools. The ability to work with the stone will help you achieve a nicer look with smaller gaps between the stones.
If you are going to shape them using hand tools, first take a junky piece to experiment with. You can use your stone chisel and 3lb hammer, or a claw hammer. Practicing on a junky piece will allow you to get a feel for shaping and trimming before you destroy any good pieces.
If you find the stone is very brittle, you may not want to chip off any pieces. In this case, your placement skills will be your most valuable asset. You may also want to cut them with a proper stone blade
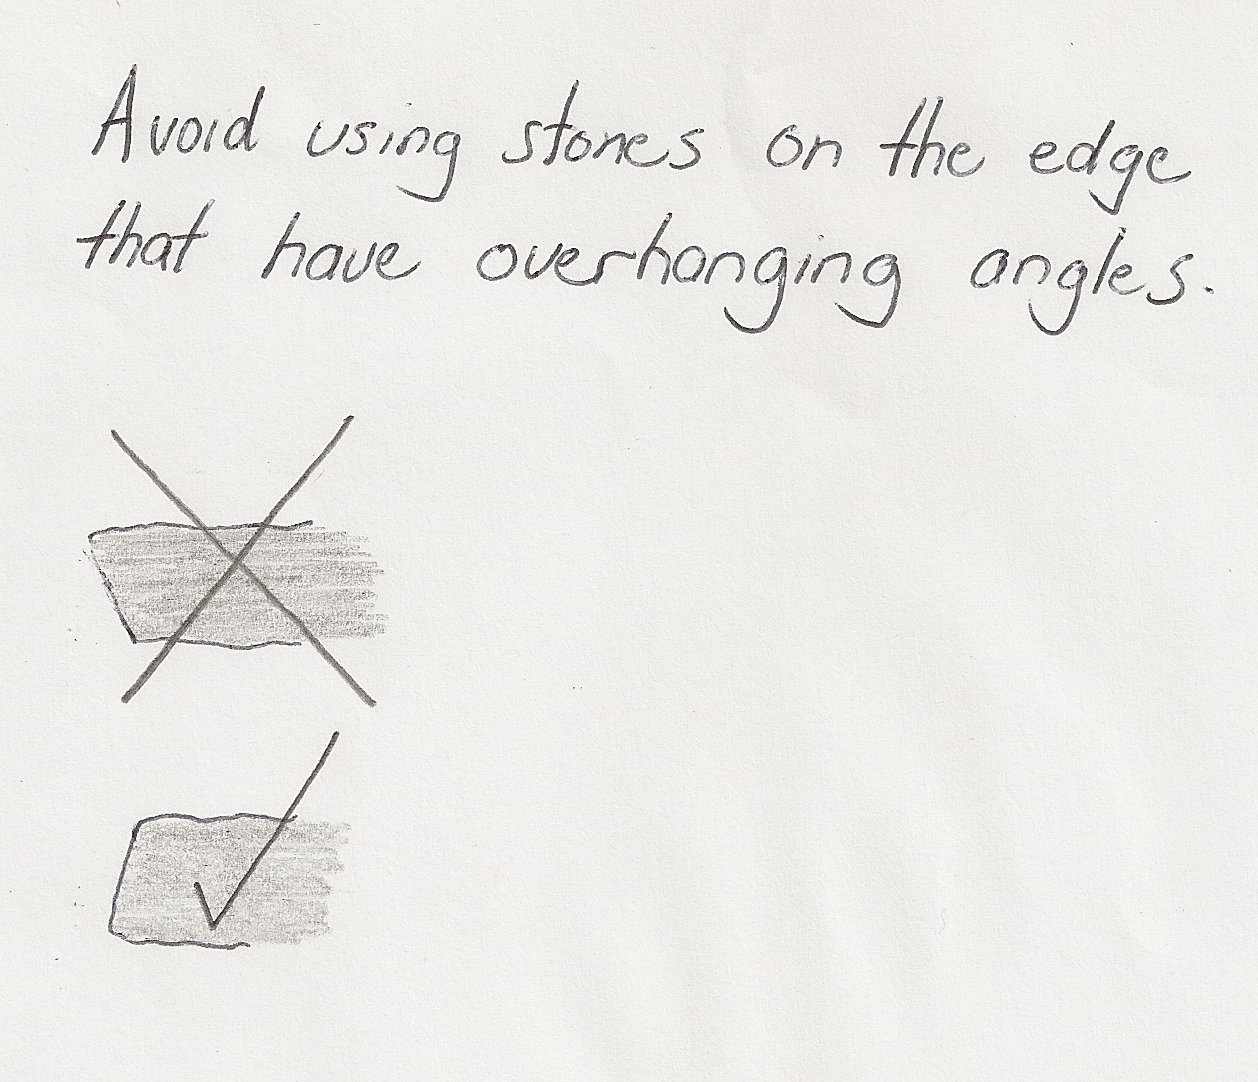 |
Bear with my sketches as my artistic abilities are lacking. The first sketch is to make sure you have stones with a tapered edge with the right side down. If the stone has a surface that requires you to use it with an overhang, then use it as a center piece and not an edge piece. Overhanging stones lack stability when placed on the edge. |
When I am laying patio stones, I always use the best, and largest stones on the perimeter.
The perimeter stones should be touching each other (closed off) at the edge of the patio. (As seen in diagram below.)
I then fill in the rest of the pieces when I have the outside done.
This looks better and also helps keep your polymeric sand or jointing material from washing away into the lawn when you are finishing the project.
If you select your edge pieces and lay them out first, you should have no problem building a patio almost any shape without having to cut a single edge piece.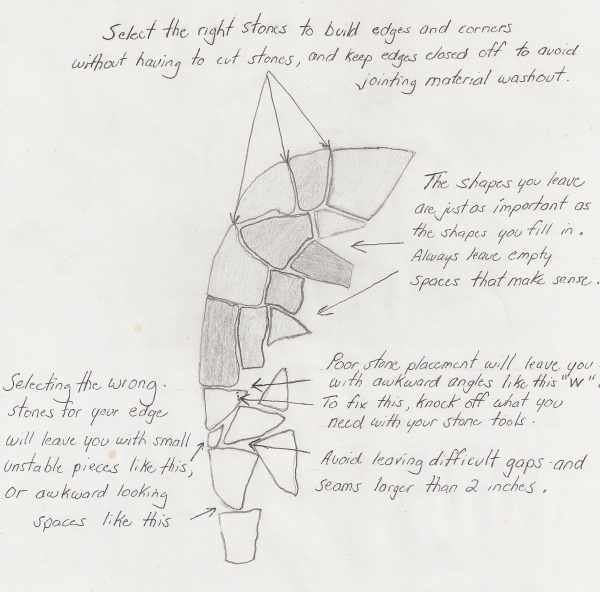
Where do I start packing in the stones?
Once they are all laid out you will have to pack in the the stones. You will be running a slight grade for drainage, so start off you project at the highest point and work away from it.
If you are starting against a house, start at the door and work your way along the house and then away from the house.
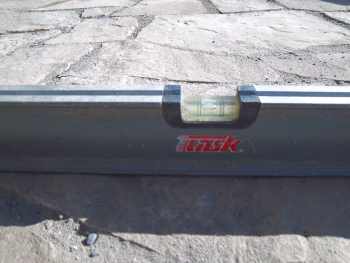
Use your level on each stone and your straight board over larger areas, to make sure the stones are always grading in the right direction. (1/4 inch per foot is plenty). Use a string tied to the stakes at the marked final patio height as a guide if you have to.
Filler pieces
Your goal here is to place all your stones, so your gaps between the stones are never greater than about 2 inches as we talked about above. However, adding a few filler pieces can give your surface more character.
Leaving a certain amount of gaps when you are placing them, or when you have a difficult spot to fill in is a great time to plan for a filler piece.
Fill in pieces should be 4 to 6 inches thick if possible. If you use smaller pieces that are less than this, they can be dislodged quite easily.
You may have to make a trip back to the stone yard for this, and pick through the junk pile for some thick pieces if you don't have enough.
Often people will use river rock or other material for the gaps to give the patio more character. Small mosaics can also be built into the gaps.
Which side of the stone goes up?
Always have the and flattest surface up that has the most character. Make sure you don't have any more than a ¼ inch variance in surface contour or ridges. These can be tripping hazards.
With some stones you may be able to knock off high spots or ridges with your hammer and chisel. Be careful not to hit directly down on the stone or you may accidentally crack it.
Another option you have to keep joints tight between the stones, is to cut your stones using a diamond tipped stone blade.
Packing the stones
Packing the stones requires even more patience. Natural flagstone will have different thickness stones so you are going to have to work with your base by taking away sand for the thicker ones, and adding sand for the thinner ones.
Part of packing the stones also means a jointing material to stabilize them. We highly recommend visiting the next section on edging and jointing as the two are interconnected. The next section covers the process of filling in the joints with sand/crushed rock, or polymeric sand.
You can use your dead blow hammer (rubber mallet), to help settle the stones by striking on the stone.
Before you do, make sure the stone is settled into the sand with very little wobble or movement first, or your risk of cracking the stone increases.
You can settle the stone by placing your hands on each side of it and twisting the stone into the sand or by moving it back and forth and from side to side.
This can be difficult with the stones being so close together if you pre-placed them all. You may have to take out adjoining stones temporarily to settle some of the stones (remember where they came from though).
Another method of setting the stones is to carefully pick up the stone by the edges, without disturbing the sand underneath.
You should see the impression the stone has left in the sand.
If it doesn't completely match the bottom of the stone then go back to adding or taking away sand in the appropriate spot to get it level again.
This can be a tricky process when you are dealing with contours in the stone itself. That is why we emphasized on inspecting pallets and picking the flattest stone possible. The flatter it is, the easier it is to work with.
Some stones will level quickly, and some may take you a few minutes. No worries, this is completely normal. Once you have the stone fairly settled into the sand, you can give it a few good hits with your dead blow hammer to further settle it in.
I strike my stones pretty hard and very rarely ever crack them. This is also why I prefer to use 2 to 3 inch flagstone for dry laid patio construction.
If you do crack one, just move the two pieces apart to make them look like they were meant to fit there. If you have any excessively large stones you can crack them on purpose to keep the size consistent throughout the patio. The thicker the stone you use, the more force they will take from a dead blow hammer.
Remember to always be double checking the grade with your level, and the straight piece of 2x4 with the level on top of it. Always check the level in every direction with every stone so you don't stray off course with you grade.
Try walking across the stones and checking for movement as you complete each small section.
Try to stand on the corners and rock them back and forth.
Do they move? This is a good test to see how well you are doing at packing in the stones.
The goal is NO movement at all. If you have movement then I suggest you go back and re-stabilize the ones that are moving. Don't get too far ahead of yourself or this becomes a difficult task.
You may have to go back to the stone yard once or twice. (That's normal.) Walk away if you come to an area that you are having a hard time with. I mean take a break. It may be 10 minutes or it may be 2 days. I don't want you to get frustrated with it, so coming back to the project later on with a fresh mind will do you a world of good.
Like I said in the beginning, this is similar to doing a big puzzle. You need to take periodic mental breaks. Most people will get the placement of the shapes and sizes, but have difficulty laying patio stone in the sand. This is completely normal and just part of the job.
Once you have all your flagstone set, you will be finishing off the surface and installing edging.
It's time now to move on to edging and jointing.
_____________________________________
Table of Contents: Flagstone Patio
D. Flagstone Patio Site Preparation
E. Flagstone Patio Base Preparation
F. Laying Flagstone Patio Stones
G. Flagstone Patio Edging and Jointing
H. Flagstone Patio Completion and Clean-up
______________________________________
Go to Dream Yard Home Page from Laying Patio Stones
Check out our time and money saving e-book

How to avoid the biggest mistakes made by DIYers, designers, and landscaping companies.
Visitor
Favorites


Giggles 'n' Thoughts
