A. Flagstone Walkway Site
You probably already have your flagstone walkway site in mind, but we are going to give you some more food for thought here. Proper design and planning information is crucial in helping you to avoid costly mistakes.
Professional plans are drawn to scale by a landscape architect or designer, then installed by a landscaping crew. For the do-it-yourselfer, basic sketches, bubble diagrams, and measurements will work just fine and save you money.
First things first. You must make sure that with any construction project you are following local laws. Check to see if you need any permits for any excavating, construction, or home improvements of any kind. Generally you don't, but it's better to be safe than sorry.
Here are some other things to consider before you start any construction in your yard.

1. Designing your walkway
I'm sure at this point in time you already have a design in mind, or maybe you are just replacing an existing walkway? If you haven't, then there are a few basic design principles that we use in the industry that I will share with you for some guidance.
Colour is somewhat of a personal preference, but I have always found that darker coloured stones tend to be more versatile with surroundings than lighter coloured stone. Mixed colours are better and tend to give so much more character to a walkway.
Hopefully your local stone yard will have a good selection for you. If they don't have something on hand that you like, ask them if they can order other products in for you. Most supply yards can get anything you want, but the price goes up, the further away the supplier or quarry is.
Lines in and around your walkway are important too. Informal designs tend to have more flowing curves, and may look better while working with natural stones. Straighter lines (formal designs), are more suited for working with manufactured products like bricks and blocks.
When designing a walkway, give your curves a reason. curves just for the sake of it may look silly. One or two curves may be Ok, but try to avoid snaking paths for no reason. A curve is great for bending around a tree, garden bed, or other feature. This is normal and looks great.
Having the right size walkway for the location is important. A front walkway should be at least wide enough for two average people to pass each other. Less travelled walkways down the side of a house, or in a backyard, do not have to follow this same guideline.
Transition zones are any points that connect your walkway to anything that will border it. Lawn, sidewalks, gardens etc. Make sure you have a plan on how you are going to connect them, and check out our module on Edging and Decorative Rock.
I use buffers frequently to transition a walkway to a lawn. Good examples of buffers are decorative rock beds with perennials, plants, or a garden. Trees are great too, but make sure the root systems will not grow into the walkway area pushing, or uplifting the stones.
Using some sort of landscape edging for containment is important when using rocks. The edging will keep the rock from migrating into the grass.
You can also control the flow of traffic in your yard with a walkway, so plan it according to where you want the traffic to go. Traffic around your walkway can also be controlled by using stepping stones placed along the length of where you want your traffic to enter or exit your walkway.
Your walkway is going to be flat (except a slight grade for draining water), so plan the direction of water flow considering all the features in and around the walkway.
Also keep in mind that repeating patterns, colours, and shapes along the walkway will give it a nice rhythm. This rhythm will give your design a unity and flow that will make it look much better.
Lighting is also an important factor in and along your walkway. Make sure you have planned this out in your excavation stage if you have to bury any power lines.
In landscape design you have to always think practically. If you are building your walkway close to any buildings, or other structures, don't leave thin or awkward strips of grass to mow. Make things functional for ease of maintenance.
If you are using it in the winter time remember the surface can get slippery. Don't use salt on the surface, and use a plastic shovel. You WILL catch the edges of the stones with a shovel and possibly damage them with a metal edged shovel.
When you are playing with ideas on shape and size use and inverted marking paint (available at most hardware stores), to paint out your ideas. You can also use a garden hose or rope.
Pre-plan for any future development in you yard as well. This means sequencing your projects in the correct order. I have seen people make errors that have cost them thousands of dollars because they didn't pre-plan future renovations in their yard.
Sequencing work will minimize damaging to existing features, and saves money by being more efficient.
I know there are many more things to consider in the design stage, but my goal here is to have you thinking in advance about your site and individual situation. This should save you time and grief down the road.
Removing an old concrete patio can create quite a mess, but it still may be possible to use some of the old sub-base.
2. Excavation
Your walkway is going to need a sub-base (gravel, sand or both underneath it), so you are going to remove all the dirt that is presently there. There can be substantial costs in excavation and disposal, so we wanted to cover a few basics.
Some cities charge a fee for this. They also may want you to separate the sod from the clean fill (dirt). In my city, it is $ 85 per ton for dumping sod, and $3 per ton for clean fill. Call the municipality, or landfill site to find out your local rules and fees. (Clean fill usually means it contains no more than 5% to 10% sod scraps.)
Another way to deal with clean fill is to keep your eyes on local bargain finder sites or other ads. Sometimes you can find someone looking for clean fill. You may even get lucky enough to have them come get it if they have the equipment.
With my excavation work, I prefer to have someone do it for me. They can come in, dig it out, and take away the dirt for the same price as equipment rental costs are for one day. The difference is, that I would still have a pile of dirt to deal with after I dug it out. They usually have it all done in an hour or two. Some tasks are just better left for others.
Don't forget to plan excavation work according to the weather. Heavy equipment can create an even bigger mess in wet weather.
3. Be aware of all the forces of nature around your site.
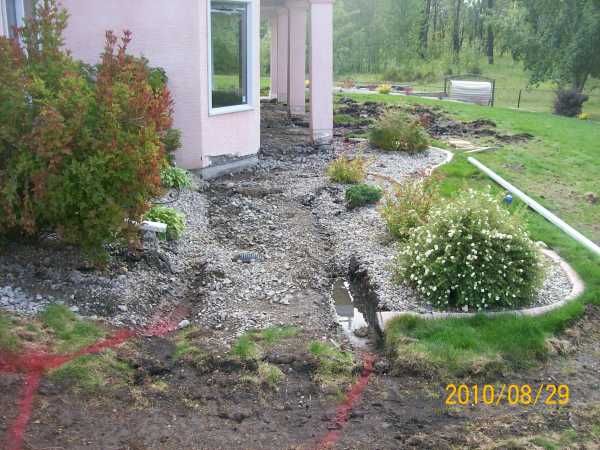
This means that you should know the drainage of you yard from rains and building downspouts. If this is not an issue for you, great. If it is, we will deal with this later in the construction stages. Also, be aware of any trees and root systems present, and future growth.
For more information on dealing with drainage in your yard, please check out this article on landscaping drainage, in our newsletter back issues.
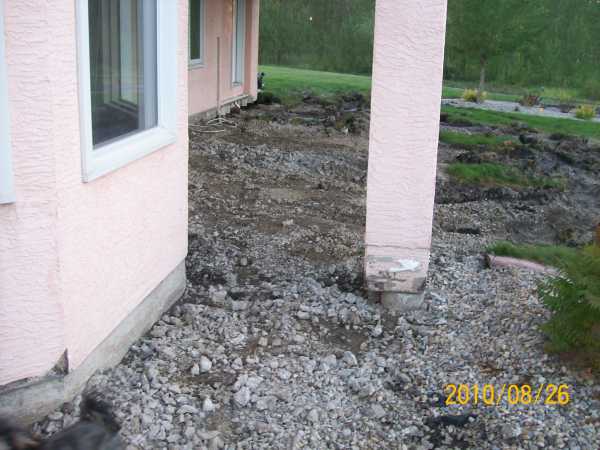
Note the downspout to the left of this planned walkway, and also the old black piece of weeping tile showing below it in the center of the walkway. It will be torn out and replaced with a new trench being dug.
4. Be aware of any man made objects that may
impact your design.
Underground gas lines, power lines, cable, water, phone, sewer, septic systems, buried drain tile can all cause you grief. These things may cause you to alter your design if you can't work around them. ALWAYS call (Or click), before you dig.
Most communities have a special number, or website to arrange this. They will mark the utilities with flags and/or landscape marking paint for you at no charge. This may save you money if you happen to damage anything.
If you have in-ground irrigation make sure you call your service company to map out where your lines are, so you don't damage them. They may also want to make changes to the system and zones to benefit your new design. They can install new irrigation to water to what you are going to plant.
5. Material and equipment planning.
Planning for materials and equipment can save you lots of time. I have on many occasions moved things more than once costing me time and money. You will be working with sand, gravel, dirt, and stones. It's important to have a plan (maybe even on paper), where you are going to keep these piles. If you are going to use the lawn, put down some heavy duty tarps.
Remember: Anything on the lawn for weeks will probably kill your grass.
If you are having products delivered make sure you are there when the truck comes, so they don't just dump it anywhere. Try to leave enough space to always allow a wheelbarrow track between any piles of materials. Try to leave a large area for laying out your stones as well. Like any stone project, its like building a puzzle. You need to be able to dump out the pieces to see what you have to work with.
Make a plan for any equipment you have to bring in your yard. If it is heavy equipment it will groove your lawn so be prepared to repair any damages. You may have to take fences apart, so make sure you have valuables secured that may disappear from your open yard.
If the equipment is high, make
sure it won't take down any power or phone lines. Natural stones have very sharp edges so keep children away from the area. (They love to run across them.)
Be considerate and responsible to the environment, your neighbors, city property and sewer systems. You can create hazards that can affect more than just you. Sediment from your materials can be washed into the street and storm drain systems if it rains, making quite a mess.
Enough site planning, let's talk about tools for your flagstone walkway.
Introduction: How to Build a Dry-laid Walkway
B. Tools for a Flagstone Walkway
C. Materials for a Flagstone Walkway
D. Preparing a Flagstone Walkway Site
E. Preparing the Base for a Flagstone Walkway
F. Laying and Packing Stones for a Flagstone Walkway
G. Flagstone Walkway Edging and Jointing
H. Walkway Completion and Clean-up
Return to the Dream-yard Home Page
Return to "The Yard": Landscaping How-to Modules
Check out our time and money saving e-book

How to avoid the biggest mistakes made by DIYers, designers, and landscaping companies.
Visitor
Favorites


Giggles 'n' Thoughts
