G. Flagstone Walkway
Edging and Jointing
Flagstone walkway edging and jointing are the two steps that will stabilize your project. There are many kinds of edging used to contain the pieces so they don't dislodge or move around. They also help to keep grasses and weeds from migrating in from the edges.
Polymeric sand should always be installed with a couple of days of dry weather. Rains can wash the polymer binding agent away.
This is not a difficult task to do. Place your edging so that it sits about half way up the edge of the stone (approx. 1 inch on two inch flagstone). Push the edging as close into the stone as you can and drive your 10 inch spike through the hole of the edging. Do this about every couple of feet as required, except on sharper curves where you should use more spikes.
When you have the whole piece spiked in, go back and hammer the nails down a little bit more so the edging is supporting the bottom 1/3 or so of the stone. This way it won't become an eyesore, but it will still give you the support you need. Do this along the whole walkway and you are done. If you need to cut any sections, use a small hacksaw.
Now you are ready to finish the surface. As I said before if you are using a natural crushed gravel between the cracks, then all you need to do is sweep it in and wet it down. Depending on what you are using, some crushed materials will actually harden up very well. Wet it down a few more times over the next few weeks and add more filler if needed. (You may have to add filler more than once, until it has finished settling).
If you are using a polymeric jointing sand, then you should visit our product profile section on jointing sand. There is a great video on installing this product.
For those of you that in climates that have frost, you may have to wait until the following year to install jointing sand. If you have built on unsettled ground, or you know you may have saturated soil, I would suggest waiting for at least one season. It is not uncommon to have land settling in new construction areas, or frost heave where saturation was present.
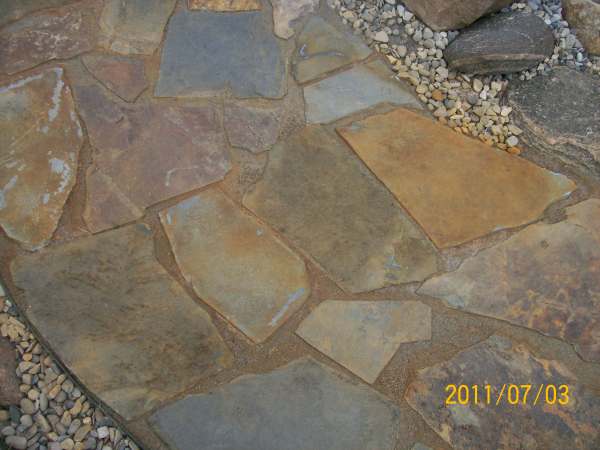
To install jointing sand you must first brush out the existing sand or crush material that you used to stabilize the stones when you were packing them in. We don't use polymeric sand when setting and packing flagstone because of the high cost. Polymeric sand is specifically used in the joints only.
A compressor will blow this sand out much quicker than using a brush, but can get a bit messy.
A stiff bristled brush works well too. All the cracks must be swept out to a depth of about 2 inches for the polymeric sand to be effective. Check the recommendation on the brand you are using. You will also have directions on the bag as to how to apply it.
The sand that I use, is just a brush in, and wet it down method. Just sweep all the polymeric sand into the joints so it is flush with the height of the stones, while brushing any excess off the top of the stones.
If you have a compressor or leaf blower, blow off the surface of the stones removing as much of the polymeric dust that you can without blowing it out of the cracks.
If you have polymeric adhesive on the stones, it will stick to them when you wet it down and be very difficult to remove.
You have to be careful here not to hold an air line or blower close to the stones. I usually hold my air line at waist height on an angle, this seems to work ok. A leaf blower should be held off the ground a couple of feet as well.
Make sure that the area and surface of the stones are completely dry before spreading polymeric sand.
Wetting down polymeric sand is not the easiest task, even for experienced landscapers. I have found that a garden hose on a fine mist works well. I always start at the highest end. You want to soak the polymeric sand as much as possible, while washing away any remaining surface dust. (This is why you start at the high end and work to the low end).
The trick in the process of doing this is not to water too heavy, or you will wash the polymeric out of the joints and onto the surface.
A couple of heavy mists of water allowing the stones to dry up a bit between each application works well. If you don't get the residue off the surface properly, it will dry on the surface of the stones and stay there until it wears off.
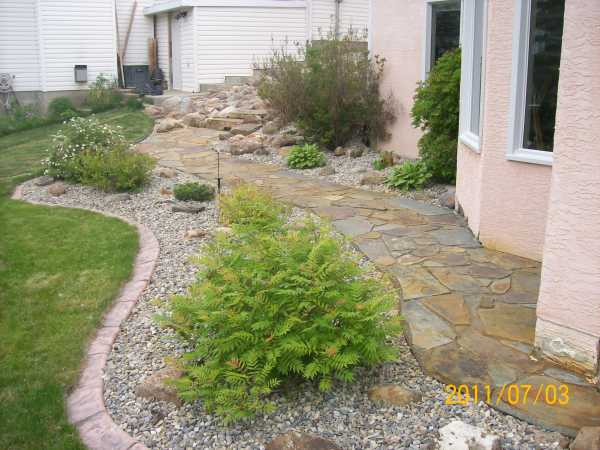
Now your dry-laid flagstone walkway is complete. You can now finish off your transition zones. If you need help with that please visit our module on Edging and Decorative Rock.
Finally, let's talk about project completion and clean-up.
Introduction: How to Build a Dry-laid Walkway
B. Tools for a Flagstone Walkway
C. Materials for a Flagstone Walkway
D. Preparing a Flagstone Walkway Site
E. Preparing the Base for a Flagstone Walkway
F. Laying and Packing Stones for a Flagstone Walkway
G. Flagstone Walkway Edging and Jointing
H. Walkway Completion and Clean-up
Return to the Dream-yard Home Page
Return to "The Yard": Landscaping How-to Modules
Check out our time and money saving e-book

How to avoid the biggest mistakes made by DIYers, designers, and landscaping companies.
Visitor
Favorites


Giggles 'n' Thoughts
