E. Base Stone Preparation
Base stone preparation is similar to wall site preparation being the foundation of your work. A dry stack stone wall has to have some of the largest and most stable stones here at the bottom.
It is extremely important to get the base right before you go any further. It is essential to start your base level, and on a solid sub-base of gravel and sand.
The more patience and time you take with the base, the easier stacking the rest of the stones will be.
This is section five of our dry stacked stone wall module. We will be covering packing the base in, and starting the bottom course of stones.
If you missed the other sections, you can find the links at the bottom of this page.
The subsoil level
You should now have excavated down to hard packed dirt or clay. You should have a pile of gravel and sand ready to go, along with a plate tamper or a jumping jack to compact the base.
The ground underneath what you have removed is considered the subsoil. You want to make sure your subsoil is packed in as well. Subsoil can be packed in with a jumping jack.
I usually put down a thin layer of gravel before I start compacting. A light mist of water will help with compaction, and keep the dust down when using compacting equipment.
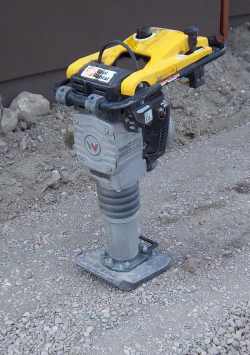 |
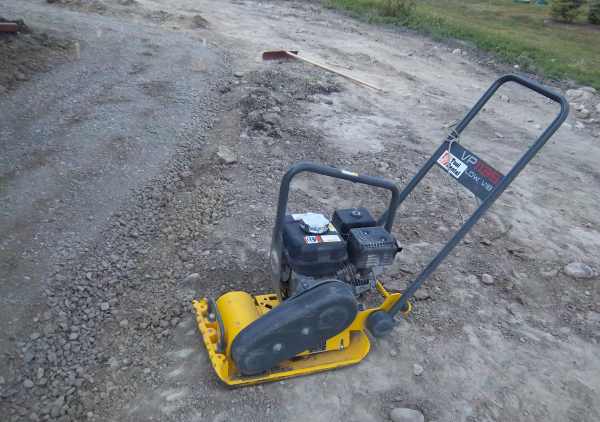 Left: Jumping Jack for packing in sub-base. Above: Plate tamper for packing sub-base. |
If you are using a plate tamper to compact the subsoil, you won't get the same compaction as a jumping jack. I would still put down an inch layer of gravel before you pack your subsoil. The plate tampers move poorly on dirt as there is nothing to grab on to. They also kick up a lot of dust so you may want to spray a light mist of water first.
Landscape fabric behind walls
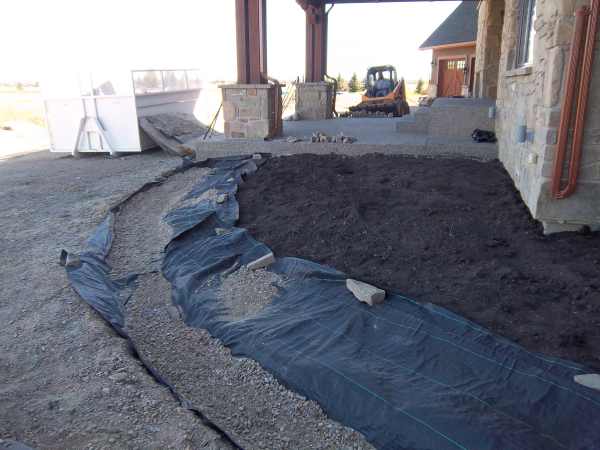
Building walls in northern climates requires me to work with landscaping fabric quite often when building walls. I lay down my landscape fabric on the subsoil so I can wrap in under the sub base and up behind the gravel back fill.
I start by rolling it out along the length of the wall with one edge about six inches in front of where the base stones and grass will meet (you can cut off any excess later).
You need to make sure you have enough fabric to go under the sub-base, wrap behind the back fill, and tuck under the last course or two of stones. For a three foot wall this means about six foot of fabric width will be enough.
If you are using landscape fabric make sure you have it pinned back with landscape pins, or by placing stones on it so it doesn’t keep blowing back onto your work area.
You will also notice on this low stone garden that drain tile will not be used. It is not recommended to use drain tile if there is little or no hydrostatic pressure or drainage issues. Higher retaining walls will experience sufficient hydrostatic pressure to make drain tile an important part of construction.
Packing in the sub base
Now you can start filling in the trench with gravel. To pack in your base with a hand tamper, just put down two inches at a time and pack. This ensures it will be packed in properly.
If you are using a rented power machine, they should be able to pack in six to ten inches at a time. This depends on the specifications of the tamper. Regardless of what the compaction rating is for the machine, pack in 2 inch layers. This is always the most effective way for the best compaction.
Once the gravel level is packed up to an inch or two of where your base stones are going to start, you can place sand on top of the gravel to make bedding the base stones easier.
Don’t put sand along the whole length of the wall. You may have to make adjustments according to grade and stone thickness as you go. Just do a few feet at a time.
Different types of stones used in a wall
You are now ready to lay the base stones but before you do I have one more task for you. Take some time to familiarize yourself with the selection of stones that you have. Just like a puzzle, dump out the landscaping stones so that you can see them all. Hopefully, you have the room to do this.
There are different names that we give to the stones that I am going to explain to you. This will allow you to make the most out of your stones. If you can sort the stones according to where they are best suited, you will have less wastage. Every stone should have a place.
|
Base Stones. Medium to large in size. One flat surface (the other surface can be buried in the sand base which allows for contours and imperfections to be absorbed by the sand). Thickness of two inches or more, wide, and long. Good stability and supportive of the weight of the other stones on top. Base stones and cap stones are fairly similar. |
Cap Stones. These should be the heaviest and longest stones you have. They should have a moderately flat surface on one side. The other surface will be the one everyone will see.
I try to pick stones that have some character for the top. Two inches or more in thickness. Longer is better than wider. These are the stones that are going to need stability enough to be walked on, kicked, bumped with a mower etc.
These stones can be glued down with landscape adhesive.
Stringers. Stringers are wall stones that are longer, but not always thicker or wider. They can stretch across multiple layers of smaller stones. Use these stones throughout the wall for stability. You can use them to lie across many smaller stones. You can also turn them to extend into the bank as anchor stones.
Tie Stone. Tie stones, or anchor stones, are stones that are wider and deeper. Use these at various intervals to extend back into the bank for an anchoring support.
Wall Stones. These are your best and flattest stones (on both sides) the more of these you have, the faster it will go. They are the easiest to stack.
Fill-in Pieces (chinking stones). These are the small block pieces and thin shim pieces that you will need to fill in small gaps between stones and to tighten the wall up when you are done.
Irregular shaped pieces (non-flat). These are the ones that you will look at and wonder how you are going to stack them in the wall. Have no fear. Try it. Having these in the wall will give it more character. If not, find another project in the yard for them, or use them for garden stepping stones.
- NOTE: Set your capstone and your base stones aside now and make sure you have enough of each before you start your wall.
Laying base stones
Start placing your stones from the lowest point up. This way if you have a grade you can step your stones so your wall is always level. It looks better to have a level wall than one that follows a grade.
For example: If your wall is 20 feet long with a grade of one foot from the low end to the high end. You will have four steps in your wall that are three inches thick. Each step will have a stone overlapping the previous one you laid.
Place the first base stone down and set it into the sand so it is a few inches back from the front edge of sand and gravel sub-base. You want to have the stone and gravel support extending out at least a few inches further than the front edge of the wall.
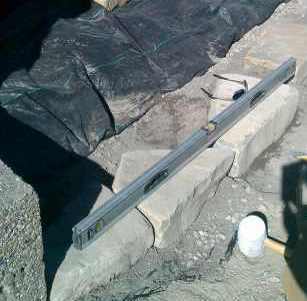
Place two hands on the stone and move it from side to side and front to back to shift the sand underneath to fit any contours of the stone. I also use my rubber dead blow hammer and give it a few good hits to pack it in. Don't beat on it too hard or you may risk cracking it.
After I have determined there is no wobble to it (this may take some time). Use your level to make sure the stone is level from side to side and front to back. It is better to have it leaning into the bank slightly to assist with the batter.
A batter is simply a lean back into the bank as an opposing force to the natural push of the soil. this can be achieved by offsetting the stones, and by having a slight angle or tilt backwards into the bank.
Some landscapers use what we call a batter box. It is simply a guide to maintain a consistent batter angle using strings and stakes. Achieving batter will also be covered in the stacking of tiers by offsetting the stones.
Choose your next base stone making sure that it will butt up nicely to the first one. Butting them together will make your wall tighter and stronger.
Depending on the thickness of the stones always try to keep the base stones level all the way across. This makes your second course of stone much easier to lay. You can add or remove sand or gravel if you have thicker stones beside thinner ones or just leave them at different heights.
The most important thing to remember when building your wall is that for strength and stability always lay your stones 2 over 1, and 1 over 2. If you don’t do this you will end up with running joints that can affect the overall integrity of the wall.
Working with and shaping the stones
Here is where you can start honing your skills if you have stones that you want together, but just don’t butt up to each other. Try using your brick set and hammer, or the flat edge of a claw hammer to take off the corners so they fit better.
Experiment with pieces that you may not use in the wall first so you don’t shatter a good piece of base stone. This test to see if the stone is brittle or not should have been done when you were buying the stones.
NEVER break split or hit stones without safety glasses on.
If you need to use the step procedure to take away any grade changes, overlap the stone a couple of inches on the previous one and continue on. Continue this procedure to the other end of the wall making sure the stones are level all the way across. You should be using your level each time you put down a base stone to make sure you don't stray of course.
You should now have a level base that you can start stacking the rest of your stones on. It may take a while to do the base, but that’s ok.
Take your time and remember it took thousands of men many years to build the pyramids. This is your project, your labor, and your time. When you are done it will look great because you took the time to do things right.
After the base stone preparation, it's time to start stacking stones.
_____________________________________
Table of Contents: Dry Stack Stone Wall
Introduction: Dry Stack Stone Wall
A. Wall Site
B. Wall Tools
H. Chinking, Completing Wall & Clean-up
______________________________________
Return to Dream Yard Home Page from Base Stone Preparation
Check out our time and money saving e-book

How to avoid the biggest mistakes made by DIYers, designers, and landscaping companies.
Visitor
Favorites


Giggles 'n' Thoughts
