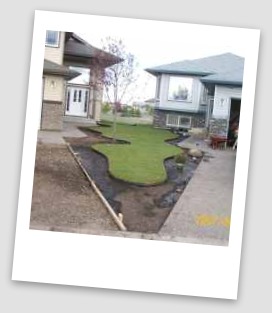
E. Installing Edging and
Decorative Rock
Installing edging is the next step once you have the area excavated. Most landscape edging is pretty easy to install, but there are a couple of things to remember.
When you hammer your stakes in to the ground, don't hammer them in all the way yet. You will have to do some height adjusting at the end of your installation. Also be careful of hammering them right through the edging. (It can tear the lower crease of edging.)
Landscape Edging Tips
Don't drive over the edging with any heavy equipment or a fully loaded wheelbarrow. (This will also ruin it.)
Try not to bend it too much or you will crease it.
Don't hammer the stakes in too hard, or you will risk bending them as well. If you feel yourself hitting a rock, take out the stake and move it to another location.
If you have to connect two pieces together, do it BEFORE you stake them into the ground, and try not to join them on sharp corners or they may have a small, unattractive gap where they are connected. Also make sure you cuts are clean or try to join them together where you haven't had to cut them.
Once the landscape edging is installed, foot press in some dirt on both sides to keep it stable, remembering not to fill it up too high on the decorative rock side.
If you want, you can now (partially) fill in the pre-dug holes with the recommended soil for each particular plant. Don't fill it all the way up just yet. This will save you a little bit of tedious work when you put your plants in after the fabric is installed.
Using Landscape Fabric
Now that your edging is installed you can lay down your landscape fabric, being careful not to break an ankle in any of your pre-dug holes for trees and plants.
This is also relatively easy, but here are a few landscaping fabric tips.
Always try to have two people install this. (It's just so much easier.) Don't roll out too much at a time on a windy day. Have your landscape pins ready to go right away to secure the fabric from moving or being blown around.
Have a VERY sharp knife or two, because they dull very quickly working around dirt.
Keep the landscaping fabric as clean as you possibly can at all times. I explained this earlier about silt and sediment becoming a haven for blown in weed seeds.
If you are using rolls and need to overlap, be generous and overlap at least a few inches. (Place a pin through both sections to save pins.)
If you are working on a grade overlap the landscaping fabric in the downward direction. The advantage to this is when you dump your rocks in from the high side, they will slide over the fabric without peeling it up at the overlap point.
Make sure the landscaping fabric overlaps any edging or curbs, otherwise (almost like filling a pond with water) the liner will be pulled a little and sucked down when you fill it with rock and you might find you don't have enough fabric around the edges. You can cut off the excess later when the rock is in.
Use your inverted marking paint to mark out the pre-dug holes that you have.
If you are installing drip irrigation to feed your landscaping shrubs, this is the time to pin down your lines to the landscaping fabric so they are buried under the decorative rock.
Installing the Rocks
Some landscapers like to do the planting now. Others will start filling in the site with the rock. I prefer to do a little of both. I find that putting down the rocks will keep the fabric from moving around or getting kicked out of place. For this reason, I will put down as much as I can without dumping rocks around my pre-dug holes. I also leave it very thin on the perimeters until I have done my final height adjustment to my edging and finished cutting off the excess fabric.
As explained previously, start on the side with the fabric overlapping if you have done so. If you have a grade it makes it much easier to push rocks downhill. If you are going to rake the rocks around, the rake stands less of a chance of catching on the fabric as well. (Turning the rake upside down and pushing the rocks works as well.)
Once again, you have the option of how you want to cut the fabric where you had previously spray painted their locations. I prefer to cut a big X, and pin back the pieces of flap to allow access for my shrubs and trees. I recommend putting down fabric where you are going to be working to keep the soil from contaminating the clean rock and fabric.
Once the plants are installed you can tuck the flaps of fabric back under the edge of the plant. (Over the dirt you just placed and under the foliage.) If you have lots of fabric left over, you can overlap where is was cut. If you have drip irrigation make sure it is set in the proper location for the plant. Now you can use your hands to push in the rest of the rocks up to the edge of the plants. Be careful not to put anything up against the base of the plants. (This can stress the plant).
If you remember with the edging that you didn't quite hammer it all the way down? You also didn't fill in the rocks too heavy at the edges? This is why. I know this step may not be for everyone because it takes a little longer, but it makes things easier for beginners. It also makes it look like a professional installation.
Now is the time to make the final height adjustments. Using your hands, push away the rock from your edging and hammer the stakes to the proper height. If the edging is bordering a lawn, make sure you set the height about an inch below the recommended cut height of the grass. This will allow you to mow over it, without having to do any extra maintenance.
Now you can cut off all the excess fabric leaving it about an inch or two below the top of the edging so it is not visible when the rest of the rock is installed. Push the rock with your hands up against the edging. If you have edging bordering grass, you should take some topsoil and foot press it against the backside of the edging.
Now you can put the rest of your decorative rock or mulch in and
rake it around so it's nice and even. You have just learned how to
install landscaping beds of rock and mulch.
Onto completion and clean-up.
_____________________________________
Table of Contents: Edging and Decorative Rock
Introduction: Edging and Decorative Rock
A. Edging Site
B. Edging Tools
C. Edging and Decorative Rock Materials
D. Edging and Decorative Rock Site Preparation
E. Installing Edging and Decorative Rock
F. Edging Completion and Clean-up
______________________________________
Check out our time and money saving e-book

How to avoid the biggest mistakes made by DIYers, designers, and landscaping companies.
Visitor
Favorites


Giggles 'n' Thoughts
