C. Selecting and Estimating Wall Materials
Purchasing stone wall materials can be a little challenging, so we
designed this section to help you do just that. We are going to show you
how to select the right materials, and estimate your needs.
Natural stone products available will vary depending on the geology of the region you live in. Landscape supply yards usually stock materials that are locally mined. Sometimes they will have other non-native products in stock, or they may be special order only.
This means buying rocks that are not native to the geology of your region is still possible, but the price of transporting the rocks over long distances will significantly increase the price.
For selecting materials, we keep descriptions as generic as we can because materials often have different names in different regions. Wall stone and flagstone are frequently named after the quarry, region, or area they come from. I have worked in different parts of North America and found this can get confusing. If you see a stone you like on the internet, print a picture of it for the suppliers. (Just like matching paint samples in a paint store).
Sometimes you may find something you like on the internet but your local supplier may not have that particular product by name. Chances are they do have what you want, but might call it a different name.
This can also happen with gravel, crushed rock, and different sand products. We put together a whole estimating series on the different materials with lots of pictures of the products, and what they are used for.
You can visit this article on estimating materials here
The amounts of wall materials you need will also vary. Sub Base requirements vary significantly from warm tropical climates, to northern climates with deep frost lines.
Whatever climate you live in, water can be a very destructive force whether it is frozen or not. It should always be controlled and directed away from your wall. If you are in a wet southern climate, you may have to consider some northern climate techniques to effectively deal with drainage issues.
This picture shows a small garden wall base for a northern climate already prepared with a 10 inch gravel sub base. Landscape fabric will keep the gravel separated from the garden soil.
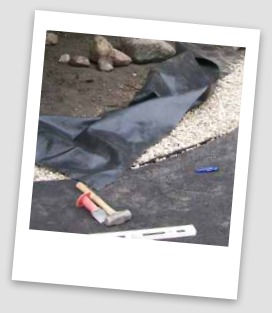
Landscape fabrics provide an excellent barrier between the clean gravel back fill, and the soil bank. Preventing soil contamination in the back fill serves two purposes. First, it prevents gravel and drain pipes from clogging with sediment if you don't use a landscape fabric sock.
Second, clean gravel provides better drainage to help prevent frost heave directly behind the wall. Dirt, potting soils, and peat can hold a lot of moisture directly behind your wall. You want to keep these away from your drainage gravel.
Industrial strength polypropylene woven fabric is sold at landscaping yards in rolls, or can be cut to order. This is used frequently in wall construction.
We have already talked about using geogrid for retaining walls over a certain height in a previous section. Once again, this requires advanced techniques and usually an engineered stamped construction plan. This module is for walls that do not require such plans. (Generally walls under 3 to 4 ft.)
Make sure you also purchase landscape pins to secure the fabric so it doesn’t slide or blow around. Working with landscape fabric in the wind can be frustrating.
Buying Stones
Stone can be sold a few different ways. By the ton or pound is always the easiest way to buy it. This way you can estimate your requirements based on the length and height of the wall.
If you have more than one stone supplier, it pays to visit them all. They may have different or exclusive products. If you get a chance to spend a bit of time in the stone yards, its worth the effort to walk around and get to know the stones.
You should be able to find someone helpful that will understand your specific needs for the wall materials you are purchasing.
I would visit suppliers on slow rainy days when they can spend a little more time with you to answer all your questions. They will appreciate this, and it will give them a chance to earn your business.
Each landscaping yard should be able to tell you what the reputable local landscapers are using for all the different wall materials, and how much coverage they are getting with those materials.
Buying full pallets of stone
For beginners, the flatter the stone, the easier it is to stack. Look for the best pallets you can. They should allow you to pick you own pallets or individual stones for smaller walls.
Inspect as many rocks as you can by walking around the pallet. Try to stay away from pallets that have lots of visible broken pieces or junk.
Inquire about the yards return policy if they have one. You will have about 5 to 10 % in wastage. This is normal. The more experienced you are with working with stone, the less wastage you will have.
Make sure you add 5% to 10% to your final estimates so you aren't short of stone.
If you find a pallet that has a lot of junk, ask them if you can return or exchange it. (This doesn’t mean pieces that you have broken, trimmed or split.)
This shouldn't be a big issue if they have a good relationship with their suppliers. They are usually credited back from the quarry when there is string of poor quality stones. the pallets are only as good as the people stacking them, so some are better than others.
You will be paying a lot for it, so make sure you get your money's worth.
Note:
One way that I use pieces that are not good enough for a wall or patio is placing them in the gardens around your project or using them for a stepping stone pathway.
I have also seen some people make some pretty nice planters or pots with leftovers.
The physical composition of certain types of stone can make it easier, or harder to work with than others.
Try to find a wall stone that you can trim, split, or shape that is not overly brittle.
Working with brittle stones can make it difficult to close gaps for a tight fitting wall when by trimming and shaping.
Having a tight fitting wall is important for the strength and stability. You want to butt the stones together as much as possible. Brittle can easily shatter stones when trying to knock off a corner or front edge.
Be aware of iron or other minerals in the wall stone. Iron and other minerals can stain concrete and may also affect certain kinds of plants in and around the wall.
Make sure you choose stone that you can handle and place yourself, or with a helper without hurting your back.
Try to stay away from stones that are a one time purchase or clearance item. You may run out or want to add to it down the road and find them out of stock. (This can happen.)
Estimating Stone Wall Materials
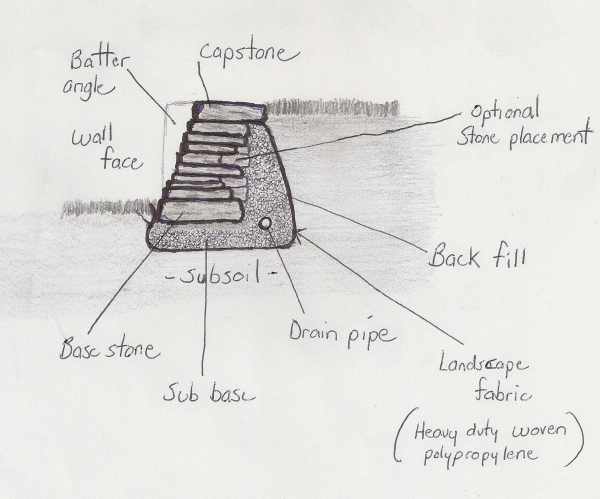
Think about the "Anatomy of a Wall" when you are considering the materials that you will need to purchase. Your climate can also determine construction techniques. This wall here was built for a northern climate with heavy frost.
Looking at this wall above, it may not be what you require for your climate. This design is of a landscape fabric wrapped wall with the back fill and stone all tightly built as one strong unit. It has a triangulated construction for resistance to frost heave.
You can modify any design you like once you understand what forces you are dealing with.
For example: A drain pipe may not be necessary for some walls when the wall is wrapped well in fabric.
The batter angle could be closer to 90 degrees for a garden wall, and the sub base may not have to be this deep.
The back fill could also be dirt for a low garden wall.
What materials are you going to need?
Now that you are a little more familiar with stone yards, you are going to have to estimate how much wall stone and gravel you need to purchase.
This is not an exact science, and natural stones can vary in density. (This is another reason why I had you inquire about a return policy.)
To estimate the amount of stone requires you to know the length and height of your wall, then you can figure out how many square feet of facing you will have.
Remember that the bottom course of stone will be partially or fully buried for added stability for a retaining wall. If you want a 3 ft. high wall retaining wall, you will need to order enough stone to account for a couple of inches being buried.
Generally, one ton of stone roughly averaging 1 ft. by 1 ft. gives you roughly 30 to 35 sq ft of wall facing. Just remember that this formula will get you close, and not exact. It is best to ask your stone supplier the coverage for the stones they are selling you.
A highly dense stone may only give you coverage of 25 to 30 sq. ft. of wall facing/ton.
Limestone walls will actually give you higher coverage per ton, as limestone is not as dense as slate.
The width of the stone will greatly affect your coverage. If you are building a garden wall, you can use stones that average 6 inches deep by 1 ft. wide. Stability will not be as much of a concern, and your coverage can be close to double that of a larger retaining wall.
Hopefully you can now see why estimating stone wall materials can be quite a challenge?
Purchasing Back Fill
Landscaping gravel is usually sold by the yard, and is needed for two things. A sub-base under your wall, and back fill behind your wall. Make your sub-base wide enough for the largest stones you will purchase (usually about 14 to 18 inches).
A good average width of stone for a 3 ft. wall would be 1 ft. You can use smaller rocks for garden stone walls as you will not need the strength and support to retain soil banks.
I make my sub-base a little wider than the width of a small plate tamper. It can be pretty awkward to pack a gravel base with a tamper that is wider than the area you excavated.
Your sub-base may be deeper than expected or called for if you have soft or unsettled soil. dig until you hit a clay base or very hard packed dirt. This means you may need a little more gravel than your ordered. I would recommend excavating before ordering the gravel if you can.
I have, on occasion had to dig down six inches to a foot further than I originally planned just to reach a solid base. (This is your subsoil level of earth) If you don't have a solid base to start from, the wall can settle under the weight giving you a "wonky" wall (I love that word).
We will talk about using jumping jacks for further compacting subsoil in the excavating section.
How much sub-base do you need?
North America and other parts of the world are divided into climate or (hardiness zones). Sub-base and back fill requirements vary depending on the climate you live in.
| Wall Height | USDA Zone | Sub base Depth |
|---|---|---|
| 1-3 foot walls | Zones 2-6 | 6-12" compacted gravel |
| 1-3 foot walls | Zones 7-11 | 6-8" compacted gravel |
Gravel back fill depths for deep frost northern climates are usually around a foot. Your local stone yards and gravel suppliers will be able to help you with estimating materials for your region based on your measurements. When it comes to back fill and packed gravel sub-base, more won't hurt you, but not enough can.
Wall Height USDA Zone Sub base Depth 1-3 foot walls Zones 2-6 6-12" compacted gravel 1-3 foot walls Zones 7-11 6-8" compacted gravel
** Note: This how-to module deals with walls up to three feet in height. Walls between three and four feet in height may need an engineered plan depending on the local laws in your region.
Walls over four feet almost always require an engineered plan. In which case, your sub base depth will be listed in your engineered plan specs. It is always in your best interest to consult an engineer when constructing walls over 4 feet.
You can avoid having to do this if you decide to tier your walls. (Splitting the height between multiple walls.) You will have to be aware of the specified distance between each tier to do this legally. This varies in different towns and cities.
Now that you know how deep, long, and wide your sub-base will be, you can use this formula to estimate how many yards of gravel you will need.
The formula for estimating gravel is also not an exact science but should get you pretty close. This formula is as follows:
L x W x D divided by 27 = # of yards of material required
Length, times the width, times the depth, divided by 27 (27 is the magical number for converting cubic feet to yards).
Ex. A wall 50 ft. long and 1.5 ft. wide (18 inches) with a sub-base requirement of 6 inches. Should look like this. (The .5 in this equation comes from .5 being half a foot. To convert the depth in inches to ft., just divide the inches by 12)
50 (length) times 1.5 ft. (width) times .5 ft. (depth) = 37 cubic ft.
37 cubic ft. divided by 27 = 1.38 yards (round this to 1.5)
NOTE: Stone yards don’t usually sell anything less than half yards unless they are equipped with a weight scale.
You can also use our volume conversion calculator to get the numbers you need to convert from cubic foot to cubic yard.
Now you can also figure out how much gravel you will need behind your wall.
Let’s figure your wall is 3 ft. high. ex. 50 ft (length) times 1 ft. (Wide) times 2.5 ft. (deep) = 150 cubic ft.
150 cubic ft. divided by 27= 5.5 yards.
This may seem like a lot, but it is always better to have a little more than less with sub-bases and back fill materials. These amounts are for northern climates with deep frost, and multiple frost heave cycles.
These amounts would definitely be overkill for Southern climates, but you still may require some gravel for adequate drainage.
The next thing you will need is some sand or fine crushed rock. This is mainly used for two things.
- When you have your sub-base packed in, put down an inch or so of sand on top. This will make is much easier to stabilize and bed the bottom course (tier) of stones. (Dry southern climates or low garden walls may only have a sand base over hard packed dirt).
- Each course after this will be back filled with gravel and topped with sand again to help you stabilize each layer by setting some sand between the stones.
You don't have to do this, but it is helpful for beginners.
Try to keep about a ¼ yard of sand on hand for every 25 ft. of wall; this is plenty for the base and all the tiers of stone.
There are many different names for sand. (Mortar sand, builder’s sand, washed sand). Your local stone yard can give you the correct type of sand when you tell them what you are using it for.
Landscape Glue. Many places carry it. Usually in your paint and caulking section. You will apply it with a caulking gun and it is used to secure you capstones. I would suggest one tube for every 15 ft. or so.
Perforated drain tile or pipe. Drain tile is used to move away heavy amounts of water. The cleaner the gravel behind your wall, the less chance of the holes and pipes becoming clogged with sediment over time.
That makes landscape fabrics we talked about earlier, a valuable asset between your back fill and dirt. You can also wrap this pipe in a landscape "Sock" to keep it free from debris if you do not use landscape fabric between the dirt and the back fill.
Now that you have planned your site, have your tools ready, and
estimated your wall materials, you are ready to move on to the next
stage in your project. It's time to... order your wall materials and start on your wall site preparation.
_____________________________________
Table of Contents: Dry Stack Stone Wall
Introduction: Dry Stack Stone Wall
A. Wall Site
B. Wall Tools
H. Chinking, Completing Wall & Clean-up
______________________________________
Return to Dream Yard Home Page from Wall Materials
Check out our time and money saving e-book

How to avoid the biggest mistakes made by DIYers, designers, and landscaping companies.
Visitor
Favorites


Giggles 'n' Thoughts
