F. Laying and Packing Stones for a Flagstone Walkway
Now you are ready to begin laying and packing stones for a flagstone walkway. If you have your sub-base packed-in, leveled, and your layer of sand is spread evenly across the surface, you are ready to start placing the stones.
Placing the stones
Before you do, it's important to know where the stones are going to go. Hopefully, you had some room to spread out the stones in your yard to see what you have to work with. (Kind of like dumping out puzzle pieces on the floor.)
Placing the stones is a learning experience so be patient, you will get better at it as you go. It is normal to take a few days just to place the stones for a small walkway. (less than 200 sq. ft.) Never rush, take your time and do it right. It may take twice that long to actually pack them into place and that's ok too.
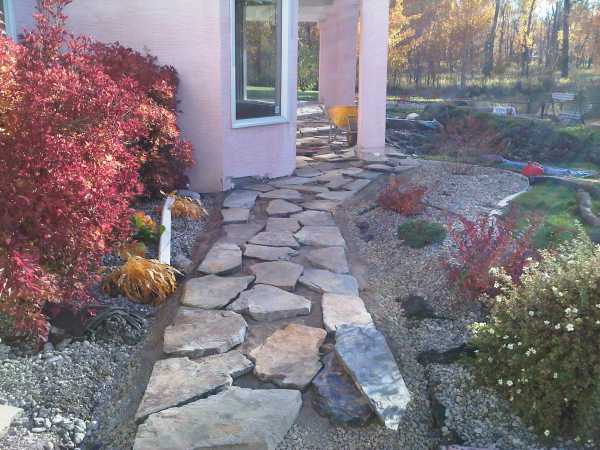
When I build a walkway, I always use the best, and largest stones along the edges first.
After I lay out the edges, I then fill in all the middle pieces. You may want to do this differently as we all do what works best for us. It is best to just place all the stones, and not pack anything in until you have large sections done.
It also helps to have the edge stones touching each other (Closed off), where they meet along the edge of the walkway. This looks better, increases the stability at the edges, and helps you retain your jointing sand. It prevents it from washing away into the lawn or buffer when you are finishing your surface.
Building your edges first will also allow you to build the entire walkway without having to cut a single stone with a stone saw.
If you are running a slight grade for drainage, start off your project at the highest point. If you are starting against a house, start at the door and work your way down the walkway from there. Use your level on each stone and a long straight board over larger areas, to make sure the stones are always grading in the right direction. Use a string tied to the stakes at the marked final walkway height as a guide if you have to.
 |
 |
Your goal here is to place all your stone pieces, so your gaps between the stones are never greater than about 2 inches. If you have gaps that are larger than that, try to fill them in with smaller pieces if you can. Fill-in pieces should be as thick as possible. (4 inches should be the minimum to keep them from easily being dislodged.)
You may have to make a trip back to the stone yard for this, and pluck through the junk pile for some thick pieces if you don't have any. It's ok if they are not the exact same stone, so long as you think they will mix in well with the rest of the colours in the walkway.
Always have the best and flattest surface up, and try to have no more than a ¼ inch variance in surface contour or ridges. These can be tripping hazards. Some stones you may be able to knock off high spots or ridges with your hammer and chisel. Be careful not to hit directly down on the stone or you may crack it.
Walk over your stones looking at the different shapes and sizes, try to place them in your head before you pick them up. When you find a piece that you think will fit, try it. If it doesn't fit, try another one. You must be patient here. If you are having a hard time finding pieces to fit, you can trim or shape them with your hand tools. The ability to work with the stone will help you achieve a nicer look with smaller gaps between the stones.
We also have a mini module that is very helpful with some advanced tips for working with flagstone. This is full of pictures and diagrams for those looking for more help after reading this section.
If you are going to work with the stone and shape them using hand tools, first take a junky piece to experiment with. You can use your stone chisel and 3lb hammer, or a claw hammer. Practicing on a junky piece will allow you to get a feel for shaping and trimming before you destroy any good pieces.These flagstone products are far too expensive to waste.
If you find the stone is very brittle and prone to shattering, you may not want to shape any
pieces with your tools. In this case, your placement skills will be your most valuable
asset. Brittle stone that is hard to work with will probably leave you with a larger gap size between the stones.
You have the option of packing in stones as you place them, or placing the whole walkway first and then packing them in. Either way is acceptable, but it is usually easier to have everything placed first.
Packing in stones
Packing in the flagstone walkway will be the greatest challenge for most people. Flagstone laying is not for everyone. Even experienced landscapers can get frustrated with this part, but the rewards is awesome when you have done it right.
Natural flagstone will have different thickness stones, so you are going to have to work with your sand base by taking away sand for the thicker ones, and adding sand for the thinner ones.
There is always a risk of cracking stones even using a rubber hammer to settle the stones. Before you use your rubber mallet (Deadblow hammer), make sure the stone is settled into the sand with very little wobble or movement to it. This will help minimize the risk of cracking the stones by having an even stable support base under the stone.
Start settling stones into the sand base by placing your hands on each side of the stone and twisting. Then you should move it back and forth, and from side to side. This is what will settle the sand to the contours of the stone.
This gets difficult with the stones being so close together when they are all pre-placed. You may have to take out adjoining stones temporarily to settle some of the stones. (Remember where they came from though!)
Pick up the stone by the edges, so not to disturb the sand underneath. You should now see the impression in the sand, and if that impression matches the bottom of the stone or not. If it doesn't match, then go back to adding or taking away sand in the appropriate spot to get it level again.
This can be a tricky process when you are dealing with contours in the stone itself. That is why I had you trying to inspect your pallets for the flattest stone possible. (The flatter they are, the easier to work with.)
Some stones will level quickly, and some may take you a few minutes. No worries, this is completely normal. Once you have the stone fairly settled into the sand, you can give it a few good hits with your deadblow hammer (rubber mallet) to further settle it in.
I pound the
stones very hard with my deadblow hammer, and rarely ever crack any. This is one more reason why I like a minimum thickness of 2 inches when I buy stone.
If you do crack one, no worries. Just leave them where they are and spread the joints apart on them, making them look like they were meant to fit there anyway.
If you have any excessively large stones you can crack them on purpose to keep the size consistent throughout the walkway.
I will often crack stones that are concave or convex on purpose to allow me to work with them much easier. otherwise its like trying to build a flat roof with a 2x4 that has a bad twist in it. It just doesn't quite as well fit with all the flat surfaces around it.
Remember to always be double checking the grade with your level, and the straight piece of 2x4 with the level on top of it. Always check the level with every stone, and in every direction so you don't stray off course with your grade.
Packing in your stones also requires you to pack in the joints with sand or crushed rock. Polymeric sand is far to expensive to use to pack stones at this stage. Regular sand or crushed rock can be used now to stabilize the stones throughout the packing process and brushed out later to prepare for polymeric sand.
Polymeric sand will help keep the rocks from being dislodged, and also prevent weeds from growing in the cracks. We recommend waiting for one season before using jointing sand if you have a saturated base, high water table, or unsettled earth which is common in new construction areas.
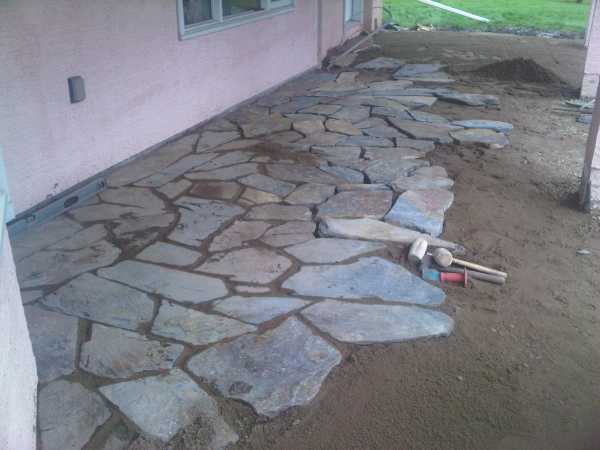
Packing in stones for a patio working away from a lower entrance. The highest point for drainage will be along the house line, and the lower entrance which is in the left corner. The grade can then be run away from the house at 1/8 inch/ft. this is plenty enough grade for this project.
For
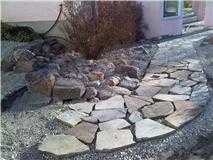
those of you that want a natural look you can pack in whatever color
of crushed rock you would like. This is the time to have it available, as you can pack it in as you go.
Try walking across the stones and checking for movement after you have placed your first small section of stones. Try to stand on all the corners and rock them back and forth. Do they move? This is a good test to see how well you are doing at packing in the stones.
The goal is NO movement at all.
If you have movement then go back and re-stabilize the ones that are moving. Don't get too far ahead of yourself or this becomes a difficult task.
You should be making some progress now, and you may have had to go back to the stone yard once or twice? (That's also normal.) If you come to an area that you are having a hard time with, walk away. I mean take a break. It may be 10 minutes or it may be 2 days. I don't want you to get frustrated with it, so coming back to the project later on with a fresh mind will do you a world of good.
Like I said in the beginning about it being similar to doing a big puzzle, you need to take periodic mental breaks. Most people will get the placement of the shapes and sizes, but have difficulty stabilizing the stones in the sand. This is completely normal and just part of the job.
So hopefully you now have your walkway stones all packed in. The sand is packed between the joints. Great, it's time now to move on to the edging and jointing.
Introduction: How to Build a Dry-laid Walkway
B. Tools for a Flagstone Walkway
C. Materials for a Flagstone Walkway
D. Preparing a Flagstone Walkway Site
E. Preparing the Base for a Flagstone Walkway
F. Laying and Packing Stones for a Flagstone Walkway
G. Flagstone Walkway Edging and Jointing
H. Walkway Completion and Clean-up
Return to the Dream-yard Home Page
Return to "The Yard": Landscaping How-to Modules
Check out our time and money saving e-book

How to avoid the biggest mistakes made by DIYers, designers, and landscaping companies.
Visitor
Favorites


Giggles 'n' Thoughts
